This remote is preset for use with the IntelliCode® 2
Access Security System. The remote can be confi
gured
for use with the IntelliCode® 1 Access Security System.
See "Programming to IntelliCode® 1 Genie® garage door
openers" for instructions on switching from
IntelliCode®
2 to IntelliCode® 1.
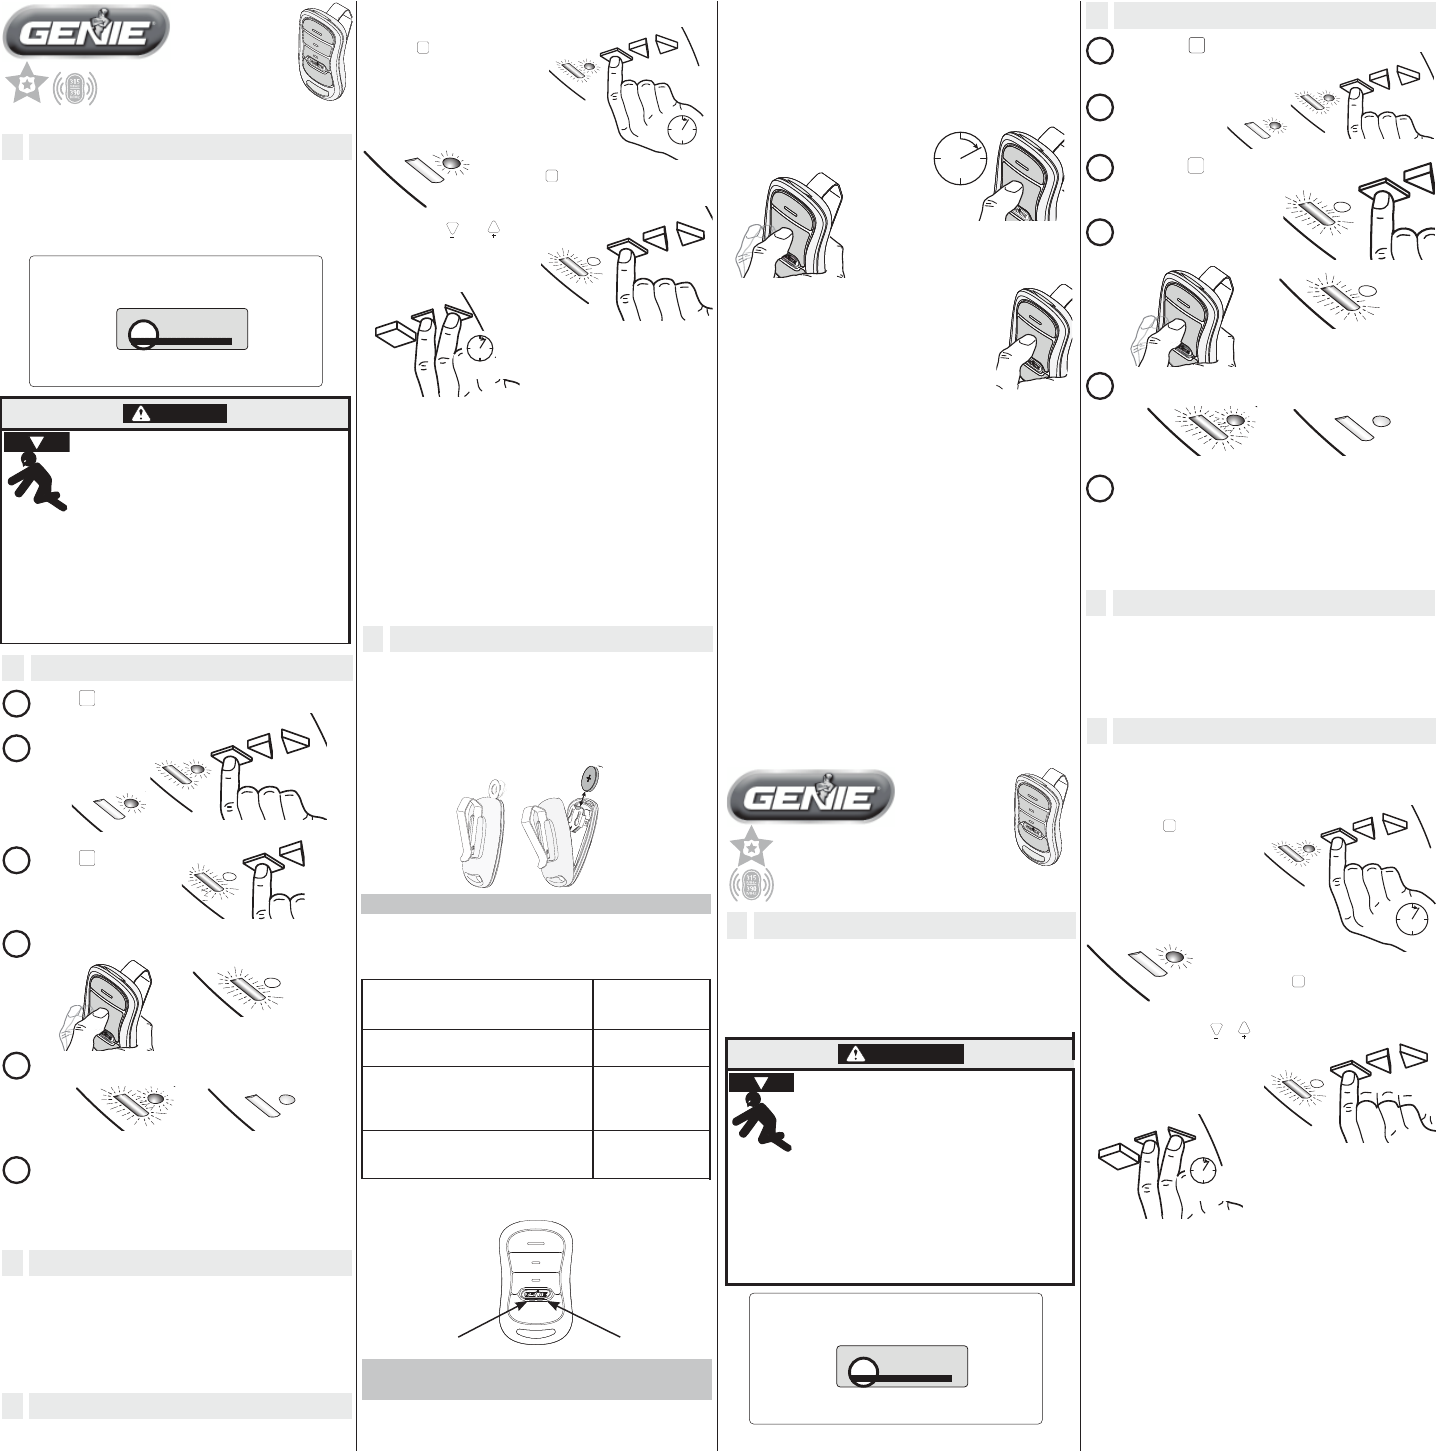
3. Press the same button twice to
toggle IntelliCode® selection from
IntelliCode® 2 to IntelliCode® 1.
INTELLICODE® FEATURES
Other models of Genie® garage door openers, remotes,
and wireless keypads use IntelliCode® 1 signals to
communicate. Remote(s) provided with this unit will
transmit either IntelliCode® 1 or IntelliCode® 2 signals.
If you have ...
Use this
IntelliCode®
programming
One or more IntelliCode® 2 openers
with a maximum 3 different openers
Use IntelliCode®
2
Mixture of openers manufactured
between 1997 and 2010
(IntelliCode® 1) and new
IntelliCode® 2 openers
Use IntelliCode®
2 and/or 1
One or more openers manufactured
between 1997 and 2010
(IntelliCode® 1)
Use IntelliCode®
1
NOTE: A maximum of 3 different openers can be
programmed to a 3 button remote.
Programming to IntelliCode® 1 Genie®
garage door openers
The default IntelliCode® 2 setting must be changed to
IntelliCode® 1.
(Follow these same steps to change IntelliCode® 1 back to
IntelliCode® 2.)
The LED color displayed on the remote indicates the
IntelliCode® mode.
Red = IntelliCode® 1 / Green = IntelliCode® 2
1. Select a button on the remote that has NOT been
programmed to the new powerhead.
2. Press and hold that button for 10 seconds.
Both Red and Green LEDs
come ON and stay ON.
4. Press the same button again to confirm
toggle. The IntelliCode® selection for this
button is set to Intellicode® 1.
5. Take the remote to the older Genie®
garage door opener and follow that
opener's instructions to program a
new remote.
Repeat for other Genie® garage remote(s) as necessary.
10 SECS
For additional information or help contact Customer
Service: Call 1-800-35-GENIE or write:
GMI Holdings Inc. d/b/a
The Genie Company
1 Door Drive
Mt. Hope, Ohio 44660
©2010 GMI Holdings, Inc. DBA The Genie Company Part Number 37250500131 05/2010
Follow these instructions to erase remote codes for
ALL other Genie® openers.
Follow the instructions on this page. Otherwise, switch
remote from INTELLICODE®2 to INTELLICODE®1 and follow
programming directions for your door opener.
ATTENTION
If your garage door opener has a Serial Number sticker which
looks like this, in which the first two numbers are 10 or higher,
your opener is equipped with INTELLICODE®2.
MODEL AC SR3 THE GENIE COMPANY
FCC ID: B8Q AC SR3 Residential Door Operator
IC: 2133A-CSD1D 120V. 60HZ. 5A
FOR HELP CALL 1-800-35GENIE OR WWW.GENIECOMPANY.COM
S/N:10XXXXXXXXXXXX
1 IMPORTANT INFORMATION
4 LOST OR STOLEN REMOTE
ALL Remote Codes will be erased from Opener
(powerhead) memory.
These instructions are for openers with the type
keypad shown below.
1. Press
PR OG RA M
SE T
and hold until
both lights come ON
blue. Release button.
2. Lights go out and
Round BLUE light
comes ON.
3. Press
PR OG RA M
SE T
again and see long
purple LED fl ashing.
4. Press both
and
simultaneously on the
powerhead and hold for
5 seconds.
Test remote operation.
Remote should not activate
door opener.
5. Reprogram the Opener with the remaining Remote(s)
(Repeat Section 2 for each remote).
PROGRAM
SET
—
+
OGRAM
SET
—
+
5 SECS
PROGRAM
SET
—
+
5 SECS
PROGRAM
SET
—
+
PROGRAM
SET
PRESS and HOLD 5 seconds
SEE BOTH Blue LEDs come ON
SEE long Purple LED
come steady ON
RELEASE
SEE round
Blue LED
come ON
1
2
3
4
5
Programming is complete. This remote button can
now be used to operate door opener.
Repeat as necessary for other remotes or buttons on
the same remote.
PRESS remote and RELEASE
(the button you want to program.)
PRESS and RELEASE
SEE long Purple LED
fl ashing
SEE both LEDs fl ash Blue and go OFF
PRESS and RELEASE remote button again
6
PRESS and RELEASE remote button a third time
2 PROGRAM THE OPENER
Red LED Green LED
Three button
remote
3 Button Remote
OPERATING INSTRUCTIONS
PR O GR A M
SE T
PR O GR A M
SE T
1. Press and HOLD the Learn Code button on the
powerhead for 10 seconds or until Radio Signal LED
indicator goes out.
2. Reprogram the Opener with the remaining Remotes
following the programming instructions for that
powerhead.
3. Reprogram the Opener with any Wireless Keypad
and other access device using the instructions
accompanying those devices.
5 BATTERY REPLACEMENT
Replace remote battery with a CR 2032 coin cell battery.
1. Open the remote case using a washer or coin that fi ts
into the slot at the top of the remote.
2. Replace battery. Match battery polarity with symbols
inside battery housing.
3. Align components and snap case closed.
FCC and IC CERTIFIED
This device complies with FCC Part 15 and RSS 210 of Industry Canada.
This equipment has been tested and found to comply with the limits
for a Class B digital device, pursuant to Part 15 of the FCC Rules. These
limits are designed to provide reasonable protection against harmful
interference in a residential installation. This equipment generates, uses
and can radiate radio frequency energy and, if not installed and used
in accordance with the instructions, may cause harmful interference to
radio communications. However, there is no guarantee that interference
will not occur in a particular installation. If this equipment does cause
harmful interference to radio or television reception, which may
be determined by turning the equipment OFF and ON, the user is
encouraged to try to correct the interference by one or more of the
following measures: 1. Re-orient or relocate the receiver antenna,
2. Increase the separation between the opener and receiver, 3. Connect
the opener into an outlet on a circuit different from that to which the
receiver is connected, 4. Consult your local dealer.
Changes or modifications not expressly app
roved by the manufacturer
could void the user’s authority to operate the equipment.
WARNING
Moving Door can cause serious injury
or death.
• Wall Console must be mounted in sight
of door, at least 5 feet above fl oor and
clear of moving door parts.
• Keep people clear of opening while door is moving.
• Do NOT allow children to play with the Remote or
door opener.
If safety reverse does not work properly:
• Close door then disconnect opener using the
manual release handle.
• Do NOT use Remote or door opener.
• Refer to Door and Door Opener Owner’s Manuals
before attempting any repairs.
3 REMOTE OPERATION
• Point Remote at the garage door and press the
button. Door will move.
• Press the Remote Button again and the door will
stop.
• Press the Remote Button again and the door will
move the opposite way. The door automatically
stops at the end of the open or close cycle.
Cet éloigné est préréglé pour l'usage avec l'IntelliCode® 2
Sécurité Système D'accès. L'éloigné peut être gured pour
l'usage avec l'IntelliCode® 1 Accès Sécurité Système. Voir
« Programmant à IntelliCode® 1 Génie® les ouvre-boîtes de
porte de garage » pour les instructions sur la commutation
d'IntelliCode® 2 à Intellicode® 1.
Suivre à ces instructions pour effacer des codes éloignés
pour TOUT l'autre Génie® les ouvre-boîtes.
Suivre les instructions sur cette page. Autrement, le
commutateur éloigné d'INTELLICODE®2 à INTELLICODE®1 et
suit programmer des directions pour ton ouvre-boîtes de porte.
ATTENTION
Si ton ouvre-boîtes de porte de garage a un autocollant de
Numéro de série qui a l'air de ceci, dans lequel le premier deux
nombres est 10 ou plus haut, ton ouvre-boîtes est équipé avec
INTELLICODE®2.
MODEL AC SR3 THE GENIE COMPANY
FCC ID: B8Q AC SR3 Residential Door Operator
IC: 2133A-CSD1D 120V. 60HZ. 5A
FOR HELP CALL 1-800-35GENIE OR WWW.GENIECOMPANY.COM
S/N:10XXXXXXXXXXXX
1 INFORMATIONS IMPORTANTES
4 ELOIGNE PERDU OU VOLE
TOUS les Codes d'Eloigné seront effacés de
l'Ouvre-boîtes (powerhead) la mémoire.
Ces instructions sont pour les ouvre-boîtes avec le pavé
numérique de type a montré ci-dessous.
1. La presse et la prise jusqu'à ce
que les deux lumières
allument le bleu. Relâcher
le bouton.
PR OG RA M
SE T
2. Les lumières sortent et autour
de la lumière BLEUE allument.
3. La presse et voit encore la LED
violette longue.
PR OG RA M
SE T
4. Les deux appuyer et simultanément
sur le powerhead et la prise
pour de 5 seconde.
Essayer l'opération éloignée.
Eloigné ne devrait pas activer
l'ouvre-boîtes de porte.
5. Reprogrammer l'Ouvre-boîtes avec le rester (Répète
Section 2 pour chacun éloigné).
PROGRAM
SET
—
+
OGRAM
SET
—
+
5 SECS
PROG RAM
SET
—
+
5 SECS
PROGRA M
SET
—
+
PROGRAM
SET
LA PRESSE et TIENT de 5 seconde.
VOIR que LES DEUX LED
Bleues allument
VOIR que LED Violette longue
est venue constant SUR
RELACHEMENT.
VOIR autour de
LED Bleue
est allumé.
1
2
3
4
5
La programmation est complète. Ce bouton éloigné
peut être maintenant utilisé pour fonctionner l'ouvre-
boîtes de porte. Répéter comme nécessaire pour autre
éloigné ou les boutons sur le même éloigné.
APPUYER éloigné et le
RELACHEMENT (le bouton
que tu veux programmer).
LA PRESSE et le RELACHEMENT
VOIR le clignotement
de LED Violet long.
VOIR que le Bleu de LED et saute
APPUYER et RELACHER le bouton éloigné encore
6
APPUYER et RELACHER le bouton éloigné un
troisième temps
2
PROGRAMMER L'OUVRE-BOITES
3 Eloigné de Bouton
INSTRUCTIONS OPERANTES
PR O GR A M
SE T
PR O GR A M
SE T
1. Appuyer et TENIR l'Apprendre le bouton de Code sur le
powerhead pour de 10 seconde ou jusqu'à ce que la
diode de Signal radio sort.
2. Reprogrammer l'Ouvre-boîtes avec le rester suivre
Eloigné les instructions de programmation pour
ce powerhead.
3. Reprogrammer l'Ouvre-boîtes avec Pavé numérique
sans fil et l'autre appareil d'accès qui utilisent les
instructions qui accompagnent ces appareils.
AVERTISSEMENT
3 OPERATION ELOIGNEE
• Eloigné de Point à la porte de garage et appuie le
bouton. La porte se déplacera.
• Appuyer le Bouton Eloigné encore et la porte arrêtera.
• Appuyer le Bouton Eloigné encore et la porte déplacera
la façon opposée. La porte arrête automatiquement à la
fin de l'au cycle ouvert ou proche.
Les portes en mouvement peuvent causer des
blessures graves ou la mort.
•
La commande murale doit être installée à un endroit
visible de la porte, à au moins 1,5 m (5 pi) du plancher
et à l’écart de toute pièce mobile de la porte.
•
Ne permettre à personne de se tenir dans l’ouverture
de la porte lorsque la porte est en mouvement.
•
Ne pas permettre aux enfants de jouer avec la télécommande ou
l’ouvre-porte.
Si le système d’inversion au contact ne fonctionne pas adéquatement:
• Fermer la porte, puis débrancher l’ouvre-porte à l’aide de la poignée de
déclenchement manuel.
• Ne pas se servir de la télécommande ni de l’ouvre-porte.
• Consulter les manuels du propriétaire de la porte et de l’ouvre-porte avant de
tenter d’effectuer toute réparation.
 (24 pages)
 (1 pages)
 (2 pages)
 Manymanuals.com
 Manymanuals.de
 Manymanuals.fr
 Manymanuals.it
 Manymanuals.pl
 Manymanuals.cz
 Manymanuals.es
 Manymanuals-pt.com
Comments to this Manuals